Get your GSTIN easily with this step-by-step guide. Learn the online GST registration process, documents needed, timelines, fees and expert tips.
GST registration is mandatory for businesses exceeding turnover limits or engaging in interstate trade, e-commerce, or imports/exports. Obtaining a GSTIN (Goods and Services Tax Identification Number) ensures legal compliance, GST collection, return filing, and Input Tax Credit (ITC) claims. The online process simplifies tax registration for businesses across India.
The GST registration process requires businesses to submit PAN, Aadhaar, registration proof, bank details, and address verification on the GST portal. After submission, an Application Reference Number (ARN) is generated, allowing applicants to track their registration status until approval.
Once verified, businesses receive a GST registration certificate (Form GST REG-06), legally authorizing them to operate under GST regulations. Keeping GST details updated ensures compliance, smooth tax filing, and ITC claims. Understanding the registration process, eligibility, and common errors helps businesses avoid penalties.
Obtaining a GST number, officially known as GSTIN, is crucial for businesses in India meeting certain turnover thresholds or involved in interstate or international trade. This guide will walk you through the GST registration process, required fees and timelines helping you apply for your GST number efficiently online

How to Register for GST: Follow These Steps
Begin your GST registration by applying for a GST number on the GST Portal. To complete GST registration, follow these steps:
Step 1: Go to the GST Portal
Access GST Portal → Services → Registration → New Registration

Step 2: Generate a TRN by completing OTP validation
The new GST registration page will be displayed. Select the New Registration option. If the GST registration application remains incomplete, the applicant can continue filling out the application using the TRN number. Here’s how you can obtain your GST registration number by completing OTP validation.
- Select the Taxpayer Type from the options provided. Choose the State as per the requirement.
- Enter the Legal Name of the Business/Entity as mentioned in the PAN database. Since the portal verifies the PAN automatically, the applicant must provide details exactly as mentioned on the card.
- In the Permanent Account Number (PAN) field, enter the PAN of the business or the proprietor. GST registration is linked to PAN, so for a company or LLP, enter the PAN of the company or LLP.
- Provide the Email Address of the Primary Authorized Signatory (this will be verified in the next step).
- Click the PROCEED button.

Step 3: OTP Verification & TRN Generation
After submitting the required information, the OTP Verification page will be displayed. The OTP is valid for 10 minutes only.
- Enter the Mobile OTP received on your registered mobile number.
- Enter the Email OTP received on your registered email address.
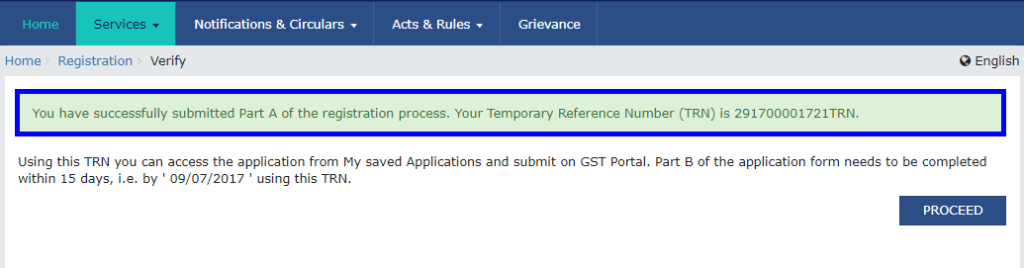
Step 4: TRN Generated
After successfully completing OTP verification, a Temporary Reference Number (TRN) will be generated. The TRN can now be used to complete and submit the GST registration application.
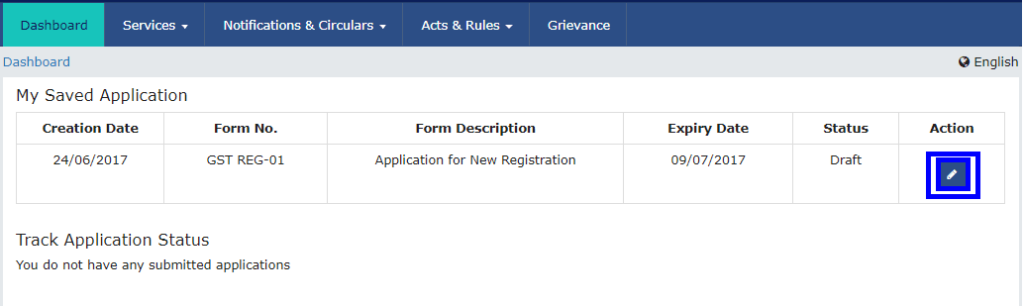
Step 5: Log in with TRN
Once the TRN (Temporary Reference Number) is received, the applicant can begin the GST registration process.
- On the GST Portal, enter the TRN in the designated field.
- Enter the captcha text as shown on the screen.
- Complete OTP verification using the OTP sent to the registered mobile number and email.
Click on ‘Register Now‘ under the ‘Taxpayers‘ section.
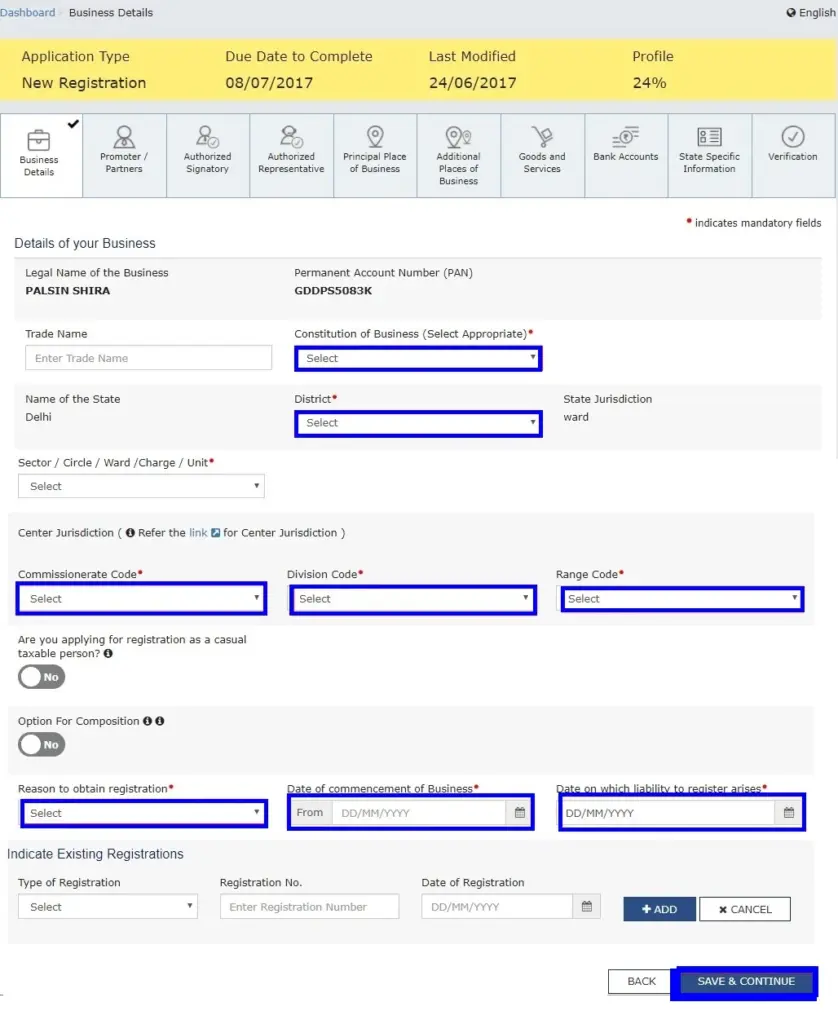
Step 6: Submit Business Information
To proceed with GST registration, the applicant must provide business details in the first tab.
- In the Trade Name field, enter the trade name of the business.
- Select the Constitution of the Business from the drop-down list.
- Choose the District and Sector/Circle/Ward/Charge/Unit from the drop-down list.
- Select the appropriate Commissionerate Code, Division Code, and Range Code from the drop-down list.
- Opt for the Composition Scheme, if applicable.
- Enter the Date of Commencement of Business.
- Select the Date on which liability to register arises. This is the date the business exceeded the aggregate turnover threshold for GST registration.
Step 7: Submit Promoter Information
In this step, the applicant must provide details of promoters and directors. For proprietorship, only the proprietor’s information needs to be submitted. A maximum of 10 promoters or partners can be included in a GST registration application.
The following details must be provided for each promoter:
- Personal Details – Name, date of birth, address, mobile number, email address, and gender.
- Designation – Role of the promoter in the business.
- DIN (Director Identification Number) – Required only for:
- Private Limited Company
- Public Limited Company
- Public Sector Undertaking
- Unlimited Company
- Foreign Company registered in India
- Citizenship Details – Nationality of the promoter.
- PAN & Aadhaar – Both must be provided for verification.
- Residential Address – Complete address details.
If the applicant provides Aadhaar, they can use Aadhaar e-sign for filing GST returns instead of a digital signature.

Step 8: Submit Authorised Signatory Information
An authorised signatory is a person nominated by the promoters to handle GST-related matters. This person is responsible for filing GST returns, ensuring regulatory compliance, and managing GST-related tasks on behalf of the company.
The authorised signatory will have full access to the GST Portal and can perform various transactions on behalf of the promoters.
Step 9: Principal Place of Business
In this step, the applicant must provide details of the Principal Place of Business. This is the primary location within the state where the business operates and maintains its books of accounts and records.
For companies and LLPs, the registered office is considered the principal place of business.
The following details must be provided:
- Address of the principal place of business.
- Official contact details – Email address, telephone number (with STD code), mobile number, and fax number (if applicable).
- Nature of possession of the premises – Whether the property is owned, rented, leased, or used with consent.
If the business is located in an SEZ (Special Economic Zone) or the applicant is an SEZ developer, relevant Government of India-issued certificates must be uploaded. Choose ‘Others’ in the Nature of possession of premises drop-down and upload the required documents.
Required Documents for Proof of Ownership or Occupancy:
- Owned Premises – Latest Property Tax Receipt, Municipal Khata Copy, or Electricity Bill.
- Rented/Leased Premises – A valid Rent/Lease Agreement, along with ownership proof of the Lessor (such as Property Tax Receipt, Municipal Khata Copy, or Electricity Bill).
- Other Cases (Including Shared Properties) – A Consent Letter with proof of ownership from the Consenter (such as Municipal Khata Copy or Electricity Bill).

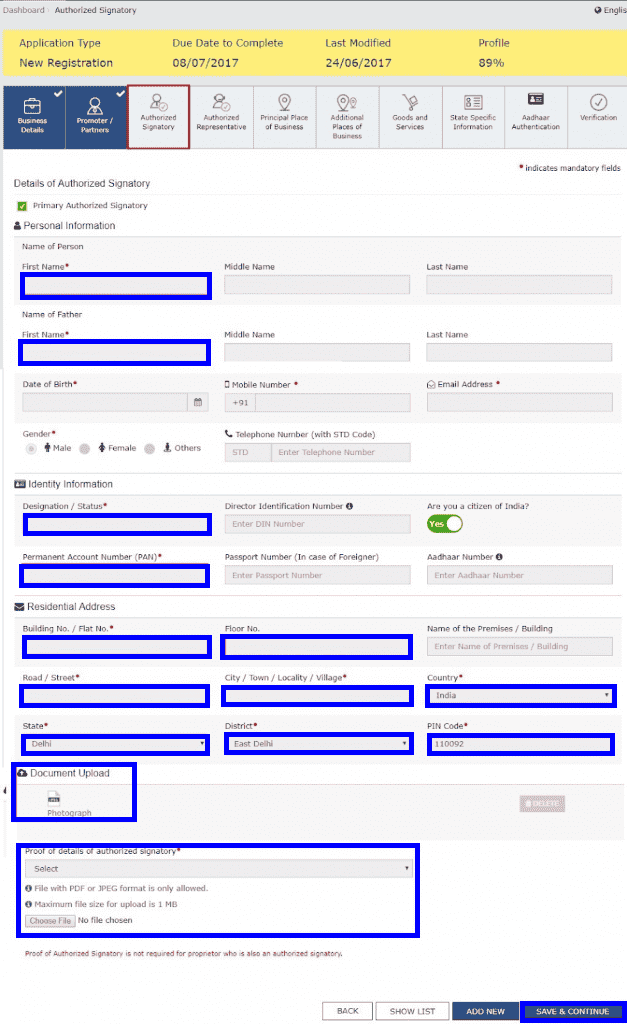
Step 10: Submit Authorised Signatory Information
Enter the details of the Authorised Signatory, similar to the details provided for Promoters/Partners in Step 7. The required information includes:
- Full Name
- Date of Birth
- Address
- Mobile Number
- Email Address
- Gender
- Designation
- PAN & Aadhaar (for verification)
- Residential Address
The Authorised Signatory will have full access to the GST Portal and be responsible for handling GST compliance on behalf of the business.
Step 11: Enter Principal Place of Business Details
The Principal Place of Business is the primary location within the state where the taxpayer conducts business. This is usually the place where books of accounts and business records are maintained and where the top management operates.
Required Information:
- Business Address – Provide the full address, including district.
- Sector/Circle/Ward/Charge/Unit – Select the appropriate options.
- Commissionerate Code, Division Code, and Range Code – Choose the correct codes.
- Official Contact Details – Enter the taxpayer’s contact number.
- Nature of Possession of Premises – Specify if the property is rented, owned, shared, etc.
Upload Supporting Documents:
- Consent Letter or NOC – Required if the business operates on rented premises.
- Proof of SEZ Unit/SEZ Developer Approval – If applicable, upload relevant approval documents.
Additional Steps:
- Checkmark the Nature of Business Activities conducted at the premises.
- Add any Additional Places of Business, if applicable.
- Click “SAVE & CONTINUE” to proceed.


Step 12: Submit Details of Goods and Services with HSN or SAC Codes
In this step, the applicant must provide details of the goods and services the business deals with.
- Enter the HSN (Harmonized System of Nomenclature) Code for up to 5 goods that are most relevant to the business.
- Enter the SAC (Services Accounting Code) for up to 5 services provided by the business.

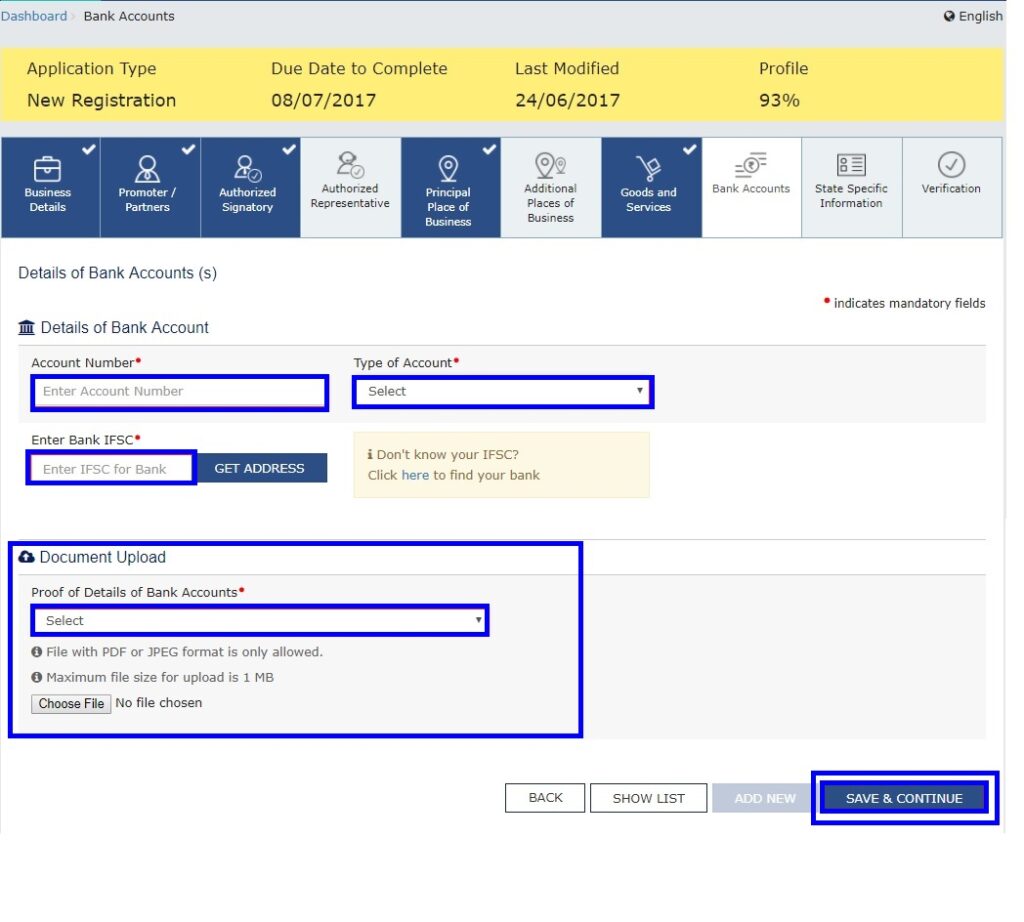
Step 13: Submit Bank Account Details
In this step, the applicant must provide bank account details for GST registration.
- Enter the total number of bank accounts held by the business.
- If there are 5 accounts, enter 5.
- Provide details for each bank account, including:
- Account Number
- IFSC Code
- Type of Account (Savings/Current)
- Upload a copy of the bank statement or passbook as proof.
Step 14: Verification of Application
After filling in all the required details, proceed to the Verification page.
- Tick the Declaration Box to confirm the accuracy of the information provided.
- Submit the Application using one of the following methods:
- For Companies & LLPs – Submission must be done using a Digital Signature Certificate (DSC).
- Using e-Sign – An OTP will be sent to the mobile number linked with Aadhaar.
- Using EVC (Electronic Verification Code) – An OTP will be sent to the registered mobile number.
Step 15: ARN Generated
Once the application is successfully signed and submitted:
- A success message will be displayed.
- An acknowledgment receipt will be sent to the registered email and mobile number.
- The Application Reference Number (ARN) will be generated and sent via email and SMS.
- The GST ARN Number can be used to track the status of the application.
By following these 15 steps, businesses can successfully complete their GST registration process.
GST Registration Fees
GST Registration is a tedious process that involves the submission of many business details and scanned documents. Although there are no fees prescribed for obtaining GST registration on the GST portal on your own, you can save a huge amount of time and effort by purchasing the GST registration plan with Vakilsearch. You can opt for Vakilsearch GST registration services, where a GST Expert will assist you end-to-end with GST Registration.
Read more: GST Registration Fees
GST Registration Timeline
Normally, when the application is filed under part A with all necessary documents it takes about 7 working days to issue a goods and services tax Identification Number. This timeframe may differ with the actual information, provided by the submitter and the verification done by the GST authorities.
Latest Updates – 12th February 2025
The Goods and Services Tax Network (GSTN) has issued an advisory on new Aadhaar and biometric authentication requirements for GST registration.
Applicants are categorized into three groups:
- Applicants not opting for Aadhaar authentication
- Applicants opting for Aadhaar authentication, requiring biometric verification
- Cases where the Application Reference Number (ARN) is not generated
Applicants must follow the guidelines outlined in the advisory. For detailed information, click here.
Conclusion
GST registration is mandatory for businesses exceeding turnover limits or engaged in interstate trade, e-commerce, or imports/exports. It ensures legal compliance, GST collection, return filing, and Input Tax Credit (ITC) claims.
The online process requires PAN, Aadhaar, business proof, and bank details on the GST portal. After submission, an Application Reference Number (ARN) is generated for tracking, and a GST registration certificate (Form GST REG-06) is issued upon approval. By following these steps, you can easily apply for and obtain your GST registration number, ensuring compliance with GST regulations.
Why Choose Vakilsearch for Your GST Registration?
Vakilsearch makes GST registration and obtaining your GST Identification Number online easy and hassle-free. Our experts handle all compliance requirements, ensure timely filing of returns, and are always available to clarify the process and answer any questions. Given the complexity of GST forms and procedures, it’s wise to rely on professional assistance to navigate the portal efficiently and accurately.
Need expert help? Get professional assistance with Vakilsearch!
FAQs on GST Registration Procedure
Visit the GST portal, fill the application, upload documents, verify via OTP, and submit. A GST ARN is generated instantly to track status or raise queries. Approval takes 3–7 working days.
To get a GST number, visit the GST portal, select Registration under Services, then New Registration, and enter your business's email, mobile number, and PAN.
There is no government fee for GST registration. However, professional service providers may charge ₹500 to ₹2,500, depending on the complexity and business type.
The GST number is usually issued within 3 to 7 working days after successful document verification and application submission on the GST portal.
Businesses with annual turnover above ₹40 lakhs (₹20 lakhs for services) must register. E-commerce sellers and inter-state suppliers are also required to apply regardless of turnover.
Yes, any business can apply for GST registration voluntarily to avail Input Tax Credit and improve credibility, even if their turnover is below the mandatory limit.
You need PAN, Aadhaar, address proof, business proof, and bank account details to apply for GST online. Proprietors must also upload a photograph.
The penalty is 10% of the tax amount due subject to a minimum of Rs. 10,000, whichever is higher, for businesses liable to register but failing to do so on time.
Visit gst.gov.in, click 'Track Application Status', and enter your ARN (Application Reference Number) to check real-time updates. What is the process of GST registration?
How to apply for a GST number?
What is the fee to apply for a GST number?
How long does it take to get a GST number?
Who is eligible for GST registration in India?
Can I register for GST voluntarily?
What documents are needed for GST registration?
What is the penalty for not registering under GST?
How can I check my GST registration status?